Water Bar for Continuous Use Road
By Robert Woodling
Best Management Practices often times call for the construction of water bars for skid trails, access roads and haul roads. The industry standard in Indiana is to construct these water diversions using the blade of a cable skidder to create a dip and mound to slow the momentum of water flowing down the skid trail. When constructed properly these mounded water bars do a decent job of preventing erosion of the closed out skid trail. But what if you intend to convert the skid trail to a permanent access road into your woods? Mounded water bars only work when machinery does not traverse the mound. When vehicles travel across the mound, tires and tracks compress the mounded soil and the mound is soon compromised.
After the last commercial harvest of my woodlot I went searching for a way to construct a water diversion that would stand up to daily travel with my crawler and tractor. I found the perfect solution while reading the book ‘Positive Impact Forestry’ by Thom J. McEvoy. My description of how I built the water bars follows. For more in-depth instructions and discussion of this type of water bar and other water diversion techniques go to: http://www.fs.fed.us/eng/pubs/pdf/w-r/98771804.pdf
The Conveyor Belt Water Bar (or how to install and upside down squeegee)
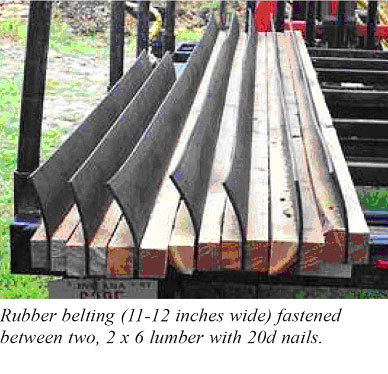
The construction of the water bar utilizing recycled rubber belting is very straight forward. The most difficult aspect of the project is locating the rubber conveyor belt. I found my supply at Ashmuth Belting Co. in Kenosha, WI. Fortunately for me, my wife’s family live in the area and I was able to combine a family visit with picking up a roll of used belting. If you do not want to travel to Wisconsin you might be able to pick up some belting from a local rock quarry, crusher, mulch company or any other outfit using a solid rubber conveyor. In addition to the 11-12” wide belting you will need 2x6 lumber, either pressure treated, white oak or black locust, and a supply of 20d nails.
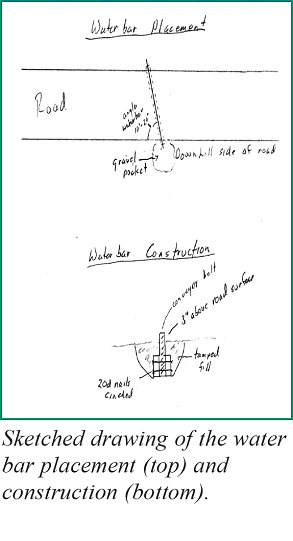
The length of the water bar will be dependent on the width of your access road and the angle of the placement. The water bar should be installed at a 10° to 20° angle across the road. The steeper the angle the higher the velocity of the water moving off the road. The steeper angle does stay somewhat cleaner.
Once the materials have been gathered cut the belting to the desired length. I found using a jig saw with a leather cutting blade to be the best for cutting the belting. Place two boards on either side of the belting and affix using the 20d nails. Clinch the nails over to prevent any backing out. If using white oak or black locust the holes will need to be pre-drilled.
Installation of the constructed water bar is also very straight forward. Dig a trench at the desired angle across the road to a depth that will allow the base of the ‘squeegee’ to rest on the bottom of the trench with 3” of blade protruding above the road surface grade. Back fill and tamp on both sides of the water bar. On the downslope side (water exit) it is a good practice to dig a pocket and fill with gravel to absorb some of the energy of the diverted water.
The rubber belting will give as vehicles pass over and spring back into position continuing to divert water run-off. Maintenance consists of periodically clearing any sediment that may build up on the upslope side of the bar. Marking the ends of the water bars with flagging is helpful if the roadway will be graded or plowed. The grader blade or plow will need to be raised before striking the water bar and a bit of hand work will be necessary to clear the road surface next to the water bar.
One final note: If using a tracked vehicle with grouser bars avoid turning on the water bar!
Happy stewarding!
Robert Woodland is a woodland owner from Monroe County. He has served as president of the Indiana Forestry and Woodland Owners Association and was the 2009 Regional Tree Farmer of the Year for Indiana and the North Central Region.